If you're just starting out as a Python RenderMan programmer, here is what you need:
If you have all this up and running already, great! Next step is HelloRenderMan Programs.
You need to have Python 3 installed and be able to run Python programs from the command line. On Linux this is bash, usually called Terminal in the desktop menus. On MacOS, it is the Terminal application in the Utilities subfolder. On MS Windows, it is PowerShell, but I'm going to call it the Terminal anyway. (You could use the old Command Prompt instead, but PowerShell is much better.)
You also need a plain text editor to write and modify Python programs with. This could be emacs, nano, Sublime, BBEdit - use whatever you are comfortable with. Or you could use a Python IDE as your editor.
Python is built-in to most versions of Linux. From the Terminal you should be able to do something like this
/home/hugh% python
Python 3.7.6 (Dec 19 2019...
Type "help", "copyright", "credits" or "license" for more information.
>>>
MacOS still ships with Python 2 installed, but you really should not be using Python 2.7 for new projects. (And my code won't work.) Download a Python 3 binary installer. Once you've installed Python 3, the Terminal commands and output will be almost identical to Linux.
On MS Windows you have to install Python yourself. Download the Python binary installer that matches your system, which is almost certainly Python 3 (64 bit).
When you run the Installer, on the third Customize Python screen
look for the option
Add python.exe to Path
and make sure it is selected.
Once the installer has finished, you should be able to open PowerShell and do the same as above:
PS C:\Users\laran> python
Python 3.7.6 (tags/v3.7.6:43364a7ae0, Dec 19 2019, 00:42:30) [MSC v.1916 64 bit (AMD64)] on win32
Type "help", "copyright", "credits" or "license" for more information.
>>>
If you're reading this you presumably already have RenderMan.
On MacOS, the command line preview display server won't run unless you have the X11 libraries. Download the XQuartz installer. And you'll have to log out and back in again.
Although RenderMan is installed, you still need to ensure that you can run the various RenderMan programs from the command line. From your terminal, command prompt, or shell you should be able to do something like this:
/home/hugh/HelloRenderMan% prman -version
Pixar PhotoRealistic RenderMan 24.4
linked Fri Apr 15 ...
If you get an error message about not being able to find prman, you need to add RenderMan to your path. Again this varies from system to system.
On my Linux laptop I added these lines to my /home/hugh/.bashrc file:
export RMANTREE="/opt/pixar/RenderManProServer-24.4"
export PATH="$RMANTREE/bin:$PATH"
export LD_LIBRARY_PATH="$RMANTREE/lib:$LD_LIBRARY_PATH"
On MacOS I added almost identical lines in my /Users/hugh/.bash_profile file. Use a plain text editor, and create the file if necessary. The period at the start of the file name is important, and also means that it won't show up in the Finder.
export RMANTREE="/Applications/Pixar/RenderManProServer-24.4"
export PATH="$RMANTREE/bin:$PATH"
export LD_LIBRARY_PATH="$RMANTREE/lib:$LD_LIBRARY_PATH"
On MS Windows you can set environment variables just for PowerShell, or in the GUI for all your applications. If you will never use RenderMan from anywhere except the PowerShell command line, check the location of your profile file and that the RenderMan installer created RMANTREE.
PS C:\Users\laran> write-host $Profile
C:\Users\laran\Documents\WindowsPowerShell\Microsoft.PowerShell_profile.ps1
PS C:\Users\laran> $Env:RMANTREE
C:\Program Files\Pixar\RenderManProServer-24.4\
And in your PS profile file add a line
$Env:Path += ";$RMANTREE\bin"
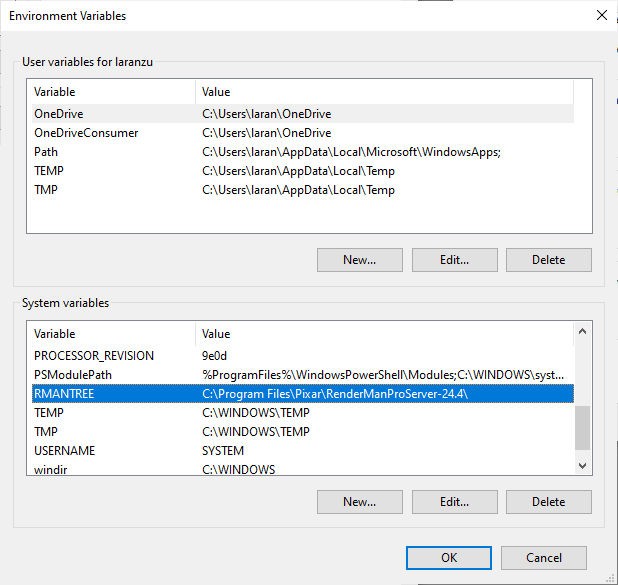
In the GUI, start by opening the System Control Panel, the Advanced tab, and finally click on Environment Variables The installer should have created a new System environment variable for you, RMANTREE. If not, create it by clicking on New....
Create or edit the User Path environment variable, and append the RenderMan bin folder:

(If you are editing the Path in Windows 8 or earlier there must be semicolons between the folder names. The Windows 10 dialog inserts them for you.)
On all three of Linux, MacOS, and MS Windows updates to your PATH don't automatically take effect. Close your Terminal window and open a new one.
The next step is to make RenderMan usable from Python programs. Start Python and type:
Type "help", "copyright", "credits" or "license" for more information.
>>> import prman
>>>
If you get an ModuleNotFoundError, the RenderMan Python package needs to be added to your Python module search path. On Linux or MacOS you should add this line to your .bashrc or .bash_profile. (Yes, the bin directory. This is not a mistake.)
export PYTHONPATH="$RMANTREE/bin:$RMANTREE/bin/pythonbindings:$PYTHONPATH"
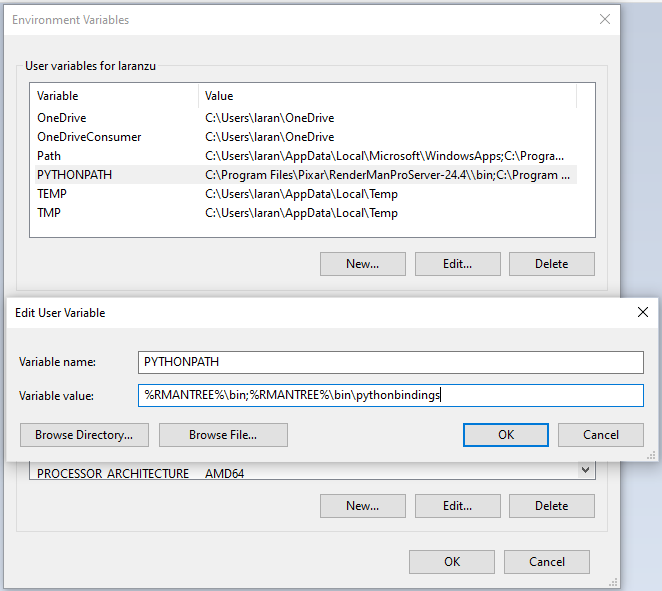
On MS Windows for PowerShell only add
$Env:PYTHONPATH = "$RMANTREE\bin;$RMANTREE\bin\pythonbindings"
to your profile. For the GUI, click through the Control Panel, Advanced Settings,
Environment Variables dialogs as above until you can create:
And since the environment has changed, restart your terminal before trying to import again.
Python inside RenderManAs of Oct 2022 the Pixar interactive renderer has a built in Python interpreter. From the menus choose Window > Console... and Window > Message Log... and you have a complete Python development environment for generating images. The good news is that the error messages are better than those from stand alone Python programs. The bad news is that in RM 24 it is the very old Python 2.7. It is still a great way to test out short code fragments.
The output from RenderMan is a series of single frame image files, so you'll need a program that can assemble these into a movie file of some kind. Something to remember is that the default output image format is 32 bits per channel, 96/128 bits per pixel; which many paint applications and image processing tools cannot open. All the code examples in this tutorial set the output to a 24/32 bit format.
A widely used open source command line tool is ffmpeg, available for Linux, MS Windows, and MacOS. It is the Swiss Army Knife of video processing, able to do anything you might imagine - if you can find the right options. Fortunately for creating videos we just need one set of options and don't need to dive into the full complexity. (Unless you want to.)
This is a package for image manipulation in Python. You don't absolutely have to have it, but it is very useful for working with texture, shadow, and height maps. To test whether it is installed, start Python from the command line and type:
Type "help", "copyright", "credits" or "license" for more information.
>>> import PIL
>>>
If you got an error message, try installing the package. Unfortunately how to do this varies from system to system, and whether you want to install PIL for everyone, just your account, or within a virtual environment. Follow the online instructions. It is worth your time figuring out how to install Pillow, because once you know how to install one package you will be able to install a wide variety of other useful Python packages. But if it gets awkward, don't worry and leave it for later.
Start rendering with HelloRenderMan Programs.
Any and all feedback about this gratefully accepted.
hugo.fisher at gmail
Copyright 2022- H Fisher, Canberra. Released under Creative Commons Attribution-NonCommercial-ShareAlike license.